Introduction
In this ngrok tutorial, you will learn how to use ngrok, a powerful and convenient tool that securely and easily exposes local servers to the internet. When developers test web applications or servers they have developed on their local computers, they often need tools to make these projects accessible via the internet. This tutorial will explore what ngrok is, how to download and install it, and provide example usages of this tool for developers and system administrators.
Learning Objectives
- Understand what ngrok is and how it works.
- Learn how to download and install ngrok on Linux and Windows operating systems.
- Discover a few different uses of ngrok and explore example usages.
- Learn to code using the Pyngrok library and examples
- Taking necessary security precautions when using ngrok
What is Ngrok?
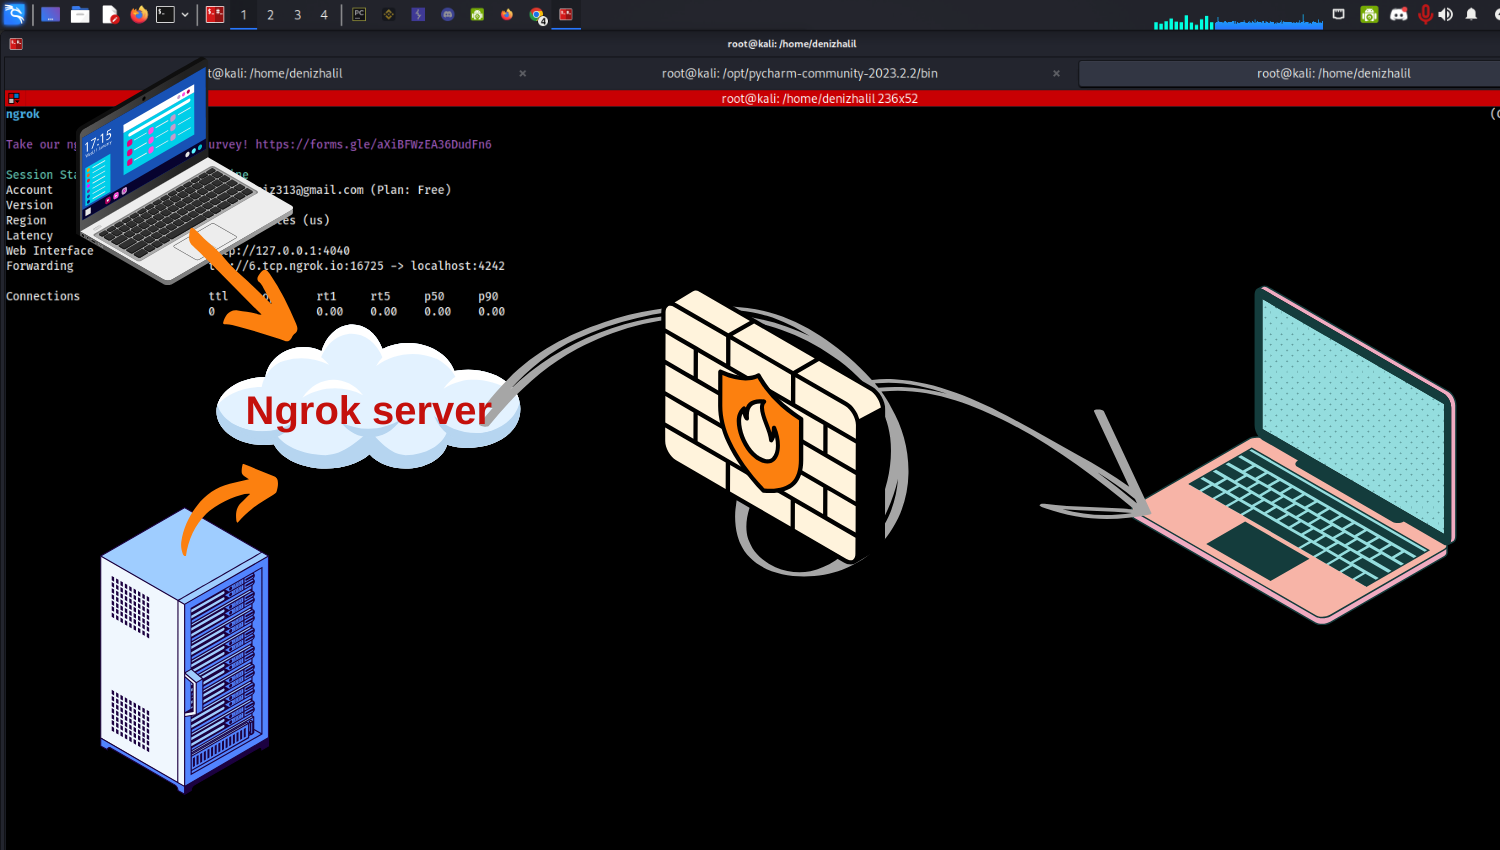
ngrok is a tool used by developers and system administrators to make the web servers or applications running on their local computers accessible over the internet. Local servers or applications are generally not accessible from the outside world, but with ngrok, you can securely share these services over the internet.
Ngrok creates a tunnel to make a local server or application publicly accessible via the internet. This tunnel supports HTTP, HTTPS, and TCP protocols and offers security and privacy features. This allows developers to test their applications and websites locally while providing instant access to remote clients or users.(Working with Sockets in Python)
Download and Installation
Linux:
- Download ngrok from the official website.
- After downloading, open a terminal and navigate to the directory where the file is located.
- Grant execute permission to the downloaded file:
chmod +x ngrok. - To start ngrok, use the
./ngrokcommand in the terminal.
Windows:
- Download ngrok from the official website.
- Extract the downloaded file to a directory of your choice.
- Navigate to the directory where the file is located in the command prompt.
- To start ngrok, use the
ngrokcommand.
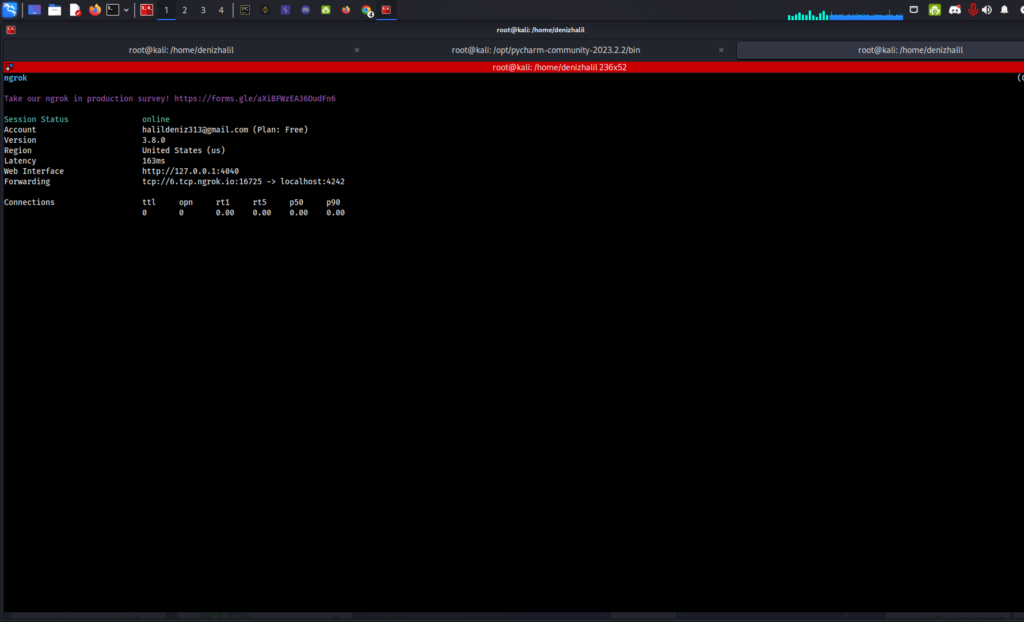
When using ngrok, you first need to add a token. The token is a personal identifier associated with your ngrok account and is required to fully utilize ngrok’s capabilities. To add a token in ngrok, use the following command:
ngrok config add-authtoken <token>Replace <token> with your personal token obtained from the ngrok website. Once you execute this command in the terminal, you can configure your ngrok token and open tunnels.
Example Usages
Here are some common ways to use ngrok and how to perform them:
- Ngrok Help Menu: To view the –help menu and get detailed information on ngrok’s commands, options, and usage, use the following command in the terminal or command prompt:
ngrok --help
NAME:
  ngrok - tunnel local ports to public URLs and inspect traffic

USAGE:
  ngrok [command] [flags]

DESCRIPTION:
  ngrok exposes local networked services behinds NATs and firewalls to the
  public internet over a secure tunnel. Share local websites, build/test
  webhook consumers and self-host personal services.
  Detailed help for each command is available with 'ngrok help <command>'.
  Open http://localhost:4040 for ngrok's web interface to inspect traffic.

Author:
  ngrok - <support@ngrok.com>

TERMS OF SERVICE: https://ngrok.com/tos

EXAMPLES:
  ngrok http 80                           # secure public URL for port 80 web server
  ngrok http --domain baz.ngrok.dev 8080  # port 8080 available at baz.ngrok.dev
  ngrok http foo.dev:80                   # tunnel to host:port instead of localhost
  ngrok http https://localhost            # expose a local https server
  ngrok tcp 22                            # tunnel arbitrary TCP traffic to port 22
  ngrok tls --domain=foo.com 443          # TLS traffic for foo.com to port 443
  ngrok start foo bar baz                 # start tunnels from the configuration file

COMMANDS:
  api                            use ngrok agent as an api client
  completion                     generates shell completion code for bash or zsh
  config                         update or migrate ngrok's configuration file
  credits                        prints author and licensing information
  diagnose                       diagnose connection issues
  help                           Help about any command
  http                           start an HTTP tunnel
  service                        run and control an ngrok service on a target operating system
  start                          start tunnels by name from the configuration file
  tcp                            start a TCP tunnel
  tls                            start a TLS tunnel
  tunnel                         start a tunnel for use with a tunnel-group backend
  update                         update ngrok to the latest version
  version                        print the version string

OPTIONS:
      --config strings    path to config files; they are merged if multiple
  -h, --help              help for ngrok
      --metadata string   opaque user-defined metadata for the tunnel session
  -v, --version           version for ngrok

PYNGROK VERSION:
   7.0.0
- Opening an HTTP Tunnel: To expose a local HTTP server (e.g., a server running on port 8000) to the internet, use the following command:
ngrok http 8000This command creates a secure tunnel and provides you with a public ngrok URL that can be shared with others to access your local server.
- Opening an HTTPS Tunnel: To expose a local server running on HTTPS (e.g., on port 8443), use the following command:
ngrok http https://localhost:8443This command opens a secure tunnel and provides you with an HTTPS ngrok URL that can be shared with others.
- Opening a TCP Tunnel: To expose a local TCP server (e.g., a MySQL database server running on port 3306) to the internet, use the following command:
ngrok tcp 3306This command opens a tunnel for the specified port and provides a TCP ngrok URL that can be used to access the server from anywhere.
- Using Subdomains: You can use a custom subdomain with ngrok by using the
--subdomainoption when starting a tunnel. For example, to open an HTTP tunnel on port 8000 with a custom subdomain “myapp”:
ngrok http --subdomain=myapp 8000- Running ngrok as a Background Process: To run ngrok as a background process on Linux or macOS, use the
&symbol at the end of the command:
ngrok http 8000 &- Inspecting Requests and Responses: Ngrok provides a web interface for inspecting requests and responses that go through your tunnels. By default, you can access this interface at
http://localhost:4040. This is a useful tool for debugging and monitoring traffic. - Forwarding to a Remote Host: You can use ngrok to forward traffic to a remote host instead of a local server. For example, to forward traffic to a server running on a different machine in your network:
ngrok tcp 192.168.1.10:3306This command forwards TCP traffic to a MySQL server running on another machine in your local network.
- Configuring Bindings: You can specify local and remote bindings with ngrok using the
--host-headeroption. For example, to specify a custom host header when opening an HTTP tunnel:
ngrok http --host-header=example.com 8000- Using ngrok with Webhooks: Ngrok is often used to test webhooks locally by exposing your local server to the internet. For instance, if you are developing a webhook on port 5000:
ngrok http 5000Once the tunnel is open, you can provide the public ngrok URL to the service that needs to send webhooks to your server.
Using Pyngrok
Pyngrok is a Python library that allows developers to integrate ngrok into their Python applications. It provides an interface to manage ngrok processes, tunnels, and configurations programmatically.
- Installation: You can install pyngrok using pip, the Python package manager:
pip install pyngrok- Creating Tunnels: With pyngrok, you can create tunnels for HTTP, HTTPS, and TCP protocols. Here’s an example of how to create an HTTP tunnel on port 8000:
  from pyngrok import ngrok

  # Create an HTTP tunnel on port 8000
  tunnel = ngrok.connect(8000, "http")

  # Print the public URL of the tunnel
print("Public URL:", tunnel.public_url)- Managing Tunnels: Pyngrok allows you to list, inspect, and manage active tunnels. For example, you can terminate a tunnel using the following code:
  # Terminate the tunnel
ngrok.disconnect(tunnel.public_url)- Configuration: You can configure ngrok using a config file, and pyngrok provides methods to set and get configuration options:
  from pyngrok import conf

  # Set authtoken
  conf.get_default().auth_token = "<YOUR_AUTHTOKEN>"

  # Get the current config
  current_config = conf.get_default()
print("Current config:", current_config)- Monitoring and Debugging: Pyngrok provides access to the ngrok web interface, allowing you to monitor and debug requests and responses going through your tunnels:
  # Open ngrok web interface in a web browser
  ngrok_url = ngrok.get_ngrok_process().api_url
  import webbrowser
  webbrowser.open(ngrok_url)
Pyngrok makes it easy to incorporate ngrok’s tunneling capabilities directly into your Python applications. This is particularly useful for testing, developing, and sharing web applications and APIs from your local machine.
By integrating pyngrok into your projects, you can leverage ngrok’s features directly from your Python code, making it a valuable tool for developers working in Python.
Security Elements
Security is an important factor when using ngrok. As ngrok exposes your local servers and applications to the internet, you should take the following precautions to ensure your security and privacy:
- HTTPS Tunnels: Use HTTPS tunnels instead of HTTP whenever possible to secure your data during transmission. HTTPS encrypts your connections, providing a layer of security.
- Access Control: Utilize ngrok’s access control features to limit who can access your tunnels. For example, you can add username and password protection using the
--basic-authparameter. - Protecting the Local Server: Make sure your local server or application is protected against security vulnerabilities. While ngrok provides the tunnel, it’s crucial to secure the local server itself.
- Privacy and Data Protection: If you plan to handle sensitive data, pay attention to privacy and data protection considerations. Implement security measures to protect the data transmitted through ngrok’s tunnels.
- Use the Latest Version: Keep up to date by using the latest version of ngrok, which typically includes security enhancements and bug fixes.
- Monitor Usage: If you need to use ngrok extensively, regularly monitor the performance and traffic of your tunnels. This can help you detect excessive usage or potential security threats.
- Tunnel Termination: Close or terminate ngrok tunnels when not in use. Unnecessary open tunnels may increase security risks.
By paying attention to these security measures, you can use ngrok more securely. Ngrok is a powerful tool, but it’s important to follow some basic rules for secure usage.
Conclusion
Ngrok is a highly useful tool for developers and system administrators that exposes local servers to the internet. Easily downloadable and installable, ngrok supports HTTP, HTTPS, and TCP protocols, providing secure and practical solutions. In this article, you’ve learned what ngrok is and how to use it while testing your local applications or sharing them with others.
Very nice! Thanks for sharing this! pyngrok is a great library supported by the community.
Just as a matter of fyi for your readers ngrok’s officially supported offering in Python is ngrok-python. You can find out more about it here: https://github.com/ngrok/ngrok-python/
Thanks!