
Introduction
Object detection plays a crucial role in the field of computer vision, with applications ranging from autonomous vehicles to security systems and retail. In recent years, deep learning-based approaches have significantly improved the accuracy and efficiency of object detection tasks. In this article, we will explore how to perform object detection and visualization using the Detectron2 library. Developed by Facebook AI Research (FAIR), Detectron2 is a flexible and powerful library for object detection tasks.
Learning Objectives
By the end of this article, you will learn:
- How to perform object detection using the Detectron2 library.
- How to visualize detected objects.
- How to develop an object detection and visualization application using Python and related libraries (cv2, torch, numpy, matplotlib).
What are Object Detection and Visualization?
Object Detection
Object detection involves identifying and locating objects within an image, providing a class label and bounding box for each object. This technique is widely used in various applications, such as autonomous driving, surveillance systems, healthcare, and retail(Harnessing Machine Learning for Enhanced Cybersecurity).


Designing Machine Learning Systems(Best Seller)
Machine learning systems are both complex and unique. Complex because they consist of many different components and involve many different stakeholders. Unique because they’re data dependent, with data varying wildly from one use case to the next.
$33.32 on AmazonVisualization
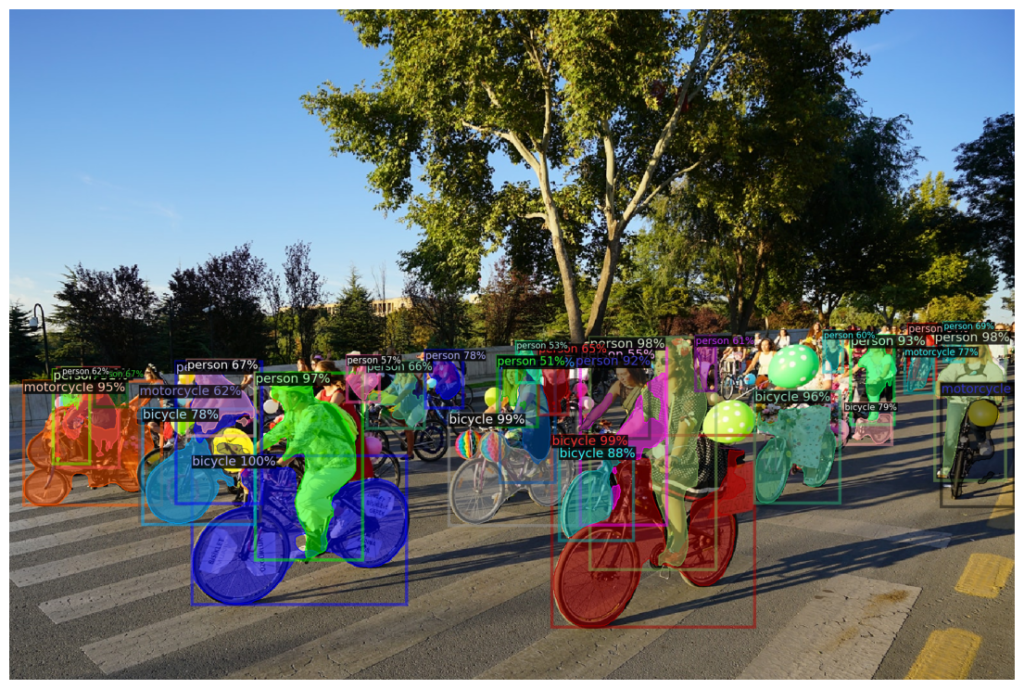
Visualization refers to presenting detected objects in a user-understandable format. It typically involves overlaying bounding boxes, masks, and class labels on the detected objects within the image. Visualization helps in interpreting and analyzing the detection results easily.
Let’s Start Coding
In this section, we’ll walk through the process of writing code to perform object detection and visualization using the Detectron2 library. We will break it down into clear steps for better understanding and implementation(Class in Python: Fundamentals of Object-Oriented Programming).
Step 1: Importing Necessary Libraries
First, we need to import the essential libraries required for object detection and visualization. These libraries include OpenCV (cv2) for image processing, PyTorch (torch) for deep learning, NumPy for numerical operations, Matplotlib for visualization, and Detectron2 for the detection model.
import cv2
import torch
import numpy as np
import matplotlib.pyplot as plt
from detectron2.engine import DefaultPredictor
from detectron2.config import get_cfg
from detectron2 import model_zoo
from detectron2.utils.visualizer import Visualizer
from detectron2.data import MetadataCatalogcv2: Used for reading and preprocessing images.torch: Provides the deep learning framework.numpy: Helps in handling array operations.matplotlib.pyplot: Used for plotting and displaying images.detectron2.engine.DefaultPredictor: Simplifies making predictions using the model.detectron2.config.get_cfg: Manages configuration settings.detectron2.model_zoo: Accesses pre-trained models.detectron2.utils.visualizer.Visualizer: Handles visualizing predictions.detectron2.data.MetadataCatalog: Provides metadata for datasets.
Step 2: Configuration
Next, we need to configure Detectron2 for object detection. This includes specifying the model architecture, loading pre-trained weights, and setting the detection threshold. The configuration is done using a configuration object (cfg).
cfg = get_cfg()
cfg.merge_from_file(model_zoo.get_config_file("COCO-InstanceSegmentation/mask_rcnn_R_50_FPN_3x.yaml"))
cfg.MODEL.ROI_HEADS.SCORE_THRESH_TEST = 0.5  # Detection threshold
cfg.MODEL.WEIGHTS = model_zoo.get_checkpoint_url("COCO-InstanceSegmentation/mask_rcnn_R_50_FPN_3x.yaml")
cfg.MODEL.DEVICE = 'cpu' # Use CPUcfg.merge_from_file(...): Loads the configuration file for the Mask R-CNN model with a ResNet-50 backbone and Feature Pyramid Network (FPN).cfg.MODEL.ROI_HEADS.SCORE_THRESH_TEST: Sets the minimum score threshold for detected objects.cfg.MODEL.WEIGHTS: Specifies the path to the pre-trained weights.cfg.MODEL.DEVICE: Defines the device for computation (CPU in this case).
Step 3: Creating the Predictor
The predictor is an object that utilizes the configuration settings to perform object detection on images. We create an instance of DefaultPredictor with our configuration.
predictor = DefaultPredictor(cfg)This predictor will use the specified model and configuration to process input images and return detection results.
Step 4: Loading and Preparing the Image
Now, we need to load an image from a specified path and prepare it for detection. The image is read using OpenCV, and its color format is converted from BGR to RGB, which is the format expected by the Detectron2 model.
image_path = "/content/drive/My Drive/Colab Notebooks/test/my_image.jpg"  # Update with your Google Drive path
image = cv2.imread(image_path)

# Check if the image is loaded successfully
if image is None:
    raise FileNotFoundError(f"Image not found: {image_path}")

image = cv2.cvtColor(image, cv2.COLOR_BGR2RGB)cv2.imread(image_path): Reads the image from the specified path.cv2.cvtColor(image, cv2.COLOR_BGR2RGB): Converts the image from BGR (OpenCV default) to RGB format.
Step 5: Performing Object Detection
With the image prepared, we can now perform object detection using the predictor.
outputs = predictor(image)This line processes the image and returns the detection results, including bounding boxes, class labels, and confidence scores.

Deep Learning with Python, Second Edition
Printed in full color! Unlock the groundbreaking advances of deep learning with this extensively revised new edition of the bestselling original.
$33.32 on AmazonStep 6: Visualizing the Detection Results
To visualize the detected objects, we use the Visualizer class from Detectron2. This class overlays the detection results on the image, making it easy to see what objects have been detected and where they are located.
v = Visualizer(image[:, :, ::-1], MetadataCatalog.get(cfg.DATASETS.TRAIN[0]), scale=1.2)
v = v.draw_instance_predictions(outputs["instances"].to("cpu"))

# Display the results
plt.figure(figsize=(14, 10))
plt.imshow(v.get_image()[:, :, ::-1])
plt.axis('off')
plt.show()Visualizer(...): Initializes the visualizer with the image and metadata.v.draw_instance_predictions(...): Draws the detected instances on the image.plt.figure(...): Sets the size of the plot.plt.imshow(...): Displays the image with detections.plt.axis('off'): Hides the axis for a cleaner view.
Conclusion
In this article, we have learned how to perform object detection and visualization using the Detectron2 library. The flexibility and powerful models provided by Detectron2 allow us to achieve high-accuracy object detection. The knowledge gained here provides a solid foundation for developing more advanced projects in the field of computer vision.
detectron2 is really a great and powerful library